Saturday, April 3, 2010

Sasha's Kitchen: Food & Wine Pairing: Braised Beef Short Ribs With Wagner Vineyards Cabernet Franc


I'm not a huge red meat eater.  Most of the time, I am content eating pasta, chicken, veal, fish, grains, fresh fruit etc . . . As long as everything is farm fresh and organic, I don't need a ton of red meat in my died.   But every so often, once or twice a month, I get a craving for red meat.  I like my meat lean, fresh and organically raised, but yes, I do enjoy a meal centered around a nice cut of red meat every so often, whether it is steak, short ribs, brisket or braised stew beef like a beef bourguignon.  I am disappointed when my bi-monthly red meat indulgence is not a good lean cut of meat, because there is nothing I detest more than excess fat.  For last night's dish, I prepared boneless short ribs, which were a wonderful lean cut from Fresh Direct.  I braised the short ribs in a braising solution that was pretty much a mixture of a full bodied red wine and chicken stock, with plenty of herbs and vegetables mixed in.  I always add a small amount of tomato paste to my braises for flavor.  I generally avoid adding more tomatoes than that though, otherwise the sauce is too heavy and overpowering.

For tonight's dinner, I paired a full bodied wine to complement the red meat, the 2007 Cabernet Franc that I received from Wagner Vineyards, a Seneca Lake Winery which is well known as one of the top Riesling producers in the Finger Lakes, and in the United States as a whole.  I've tried a lot of great Finger Lakes Rieslings, but not yet a Cabernet Franc.  Cabernet Franc is similar to Cabernet Sauvignon, but buds and ripens a week or two earlier, which allows it to thrive in cooler climates like the Finger Lakes of New York, and Southern Ontario, as well as the Loire Valley (France).

Wagner Vineyards' 2007 Cabernet Franc was quite delightful.  It was a full-bodied wine that had hints of berries - mostly cherry and perhaps a bit of red currant.  It wasn't too dry, but had just a bit of a burst of cherry and a pleasant aroma.  I thought that it paired nicely with the red meat and the wine complement of the sauce.


Cabernet Franc Grapes: Image courtesy of Wikipedia


Sasha's Braised Beef Short Ribs

2 cups dry red wine (either use Cabernet or a red cooking wine)
2 1/2 quarts of organic, low sodium chicken stock or beef stock (I used chicken stock)
4 T canola oil
8-9 boneless beef short ribs (about 3 to 3.5 pounds)
salt to season
pepper to season
flour or matzo meal for dredging (use flour, unless you are doing this during Passover)
10 cloves of garlic, diced
1 onion, diced
3 large handfulls of baby carrots
2 stalks of celery, cut into small pieces
1 medium leek, coarsely chopped
1/4 cup parsley
2 tsp diced ginger
2 bay leaves
1/4 cup parsley
3 T tomato paste
2 sprigs of thyme
1 sprig rosemary

Heat half of the oil in a large Dutch Oven on medium high.  Season the boneless short ribs with salt and pepper and dredge in flour or matzo meal.  I used matzo meal so not to overtly break Passover (yet!, this holiday isn't lasting the full eight days for me though), but you would ordinarily just use flour.  Sear 4-5 minutes on each side until fully browned.  Set the meat aside on a plate.

Using the same pot, add the vegetables and herbs.  Add the remaining Canola Oil and brown the vegetables lightly for about 7-8 minutes.  Then stir in three tablespoons of tomato paste.  Add the wine, chicken stock and seared beef short ribs to the pot.  Bring to a boil and then cover the pot and put it in an oven that has been preheated to 350 degrees.  Braises the ribs for about two and a half hours in the oven.  When you open the pot, they should be tender and fall apart when you cut them with your fork.  You can serve with the sauce as is (we did and it was great) or you can reduce the sauce if you prefer a thicker sauce to accompany the meat.

Short Ribs on FoodistaShort Ribs
Share/Save/Bookmark

Friday, April 2, 2010

Sasha's Kitchen: Vermont Goat Cheese-Cheddar Souffle (Cookbook Review Of Dishing Up Vermont)


I have written quite a bit of recipes where I discuss sustainable, farm fresh cooking.  Even though I don't live in the country, I prefer to cook with locally produced, farm fresh, organic produce and ingredients, raised using sustainable agricultural techniques.  Brooklyn's farmers markets are a wonderful place to purchase such produce and I have found numerous fantastic local farm-to-table restaurants here in Brooklyn.  Not surprisingly, I have long been a fan of Vermont  fresh foods, as Vermont is one of the birthplaces of the sustainable farm-to-table movement that has reshaped America's culinary landscape.  My husband and I are actually traveling to Vermont myself in June and hope to experience some local Vermont cooking firsthand, which of course, I will share in this blog.

With this background, I was excited to receive a courtesy copy of Tracy Medeiros's cookbook, Dishing Up Vermont from her publisher last week.  This cookbook is a compilation of authentic farm-to-table recipes from the green mountain state.  Tracy's cookbook provides a birds eye view into the local Vermont foodie culture that has taken the nation by storm in the sustainable agricultural movement.  The cookbook includes numerous fabulous recipes from businesses in Vermont that are part of the Vermont Fresh Network (VFN).  It focuses exclusively on recipes from the network of farmers, chefs, restaurants and growers that make up the Vermont sustainability movement.

Even though I don't live in Vermont, I am excited to test out many of these recipes here in Brooklyn since I share the same passion for sustainability and farm fresh produce in my own cooking as set forth in the pages of Dishing Up Vermont.  In addition, the author of the cookbook will be speaking on April 8 at Murray's Cheese House in Manhattan at 6:30 PM (by advance registration).


Vermont Goat-Cheddar Cheese Souffle (From Hemingway's Restaurant in Killington, VT, page 124 of Dishing Up Vermont)

1 T ground almonds
1.4 tsp ground fennel
3/4 cup plus 3 T whole milk
2 T unsalted butter
2 1/2 T flour
salt to taste
7 1/2 oz Vermont goat cheese
2 oz Vermont sharp cheddar cheese (i.e. Cabot), shredded
3 egg yolks
4 egg whites

Preheat the oven to 375.  Be sure the oven is fully preheated by the time you put the souffle(s) in the oven.  This recipe makes eight small souffles, or one large souffle.  I was making it as a dinner entree, so I prepared one large souffle.

Bring the milk to a boil in a saucepan and remove from heat.  Melt the butter and add the flour an cook for several minutes, whisking the entire time.  Increase the heat to medium, and add the milk.  Bring to a boil for a minute and remove from the heat.  Add a bit of salt and all of the cheeses.  Mix fully with a whisk until all of the cheese has melted and beat in the egg yolks, after you separate the eggs.  Save the whites, as this is a souffle, so you will surely need them.

To make a souffle, you will need either a handheld egg beater, or better yet, a Kitchenaid artisan stand mixer.  Beat the egg white on the highest speed with the mixer, with a bit of cream of tartar added.  Continue beating for about five minutes until foamy (but not too long that it is dry) and stiff peaks form.  This will take about three or four minutes of constant beating, just like in my other souffle recipes.  Then gently fold half of the egg white mixture into the batter.  Fold in the other half and place in the souffle dish or ramekins.

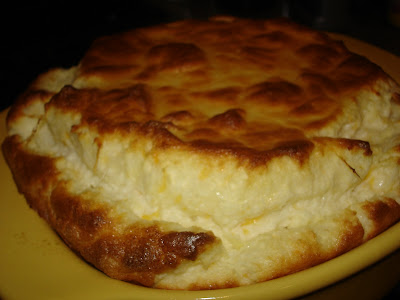
Bake for 45 to 50 minutes at 375 in the preheated oven.  The souffle should rise significantly and turn golden brown.  Don't be tempted to take it out sooner just because the outside starts to look done.  Further, whatever you do, do not open the oven during the cooking process, or the souffle will collapse.  This was a fabulous recipe and a great way to showcase terrific local Vermont cheeses (Cabot and fresh Vermont goat).  My husband and I loved the way the souffle looked and tasted.
Share/Save/Bookmark

Thursday, April 1, 2010

Emily's Kitchen in Seattle: Adventures in Gefilte Fish


Gefilte fish. Does anyone know what those gray lumps suspended in gelatinous brine even are? They hit the "kosher for Passover" shelves each spring, along with other strange Jewish foods - syrupy wine, dry matzah, potato starch - I cringe to walk around the supermarket with these embarrassing older relatives of mine. And yet, I love them. They are the key to my existence.

The funny thing is that all these old-world foods, which were probably fashioned out of few resources and convenience, are now dehydrated, salted, preserved and boxed to make our lives "easy." This is more than a story about how to make gefilte fish. It is a story about getting back to roots.

I got this idea into my head that I would make gefilte fish from scratch. My wonderful fiancé caved to my persistence and begrudgingly drove me in a rainstorm, 30 minutes before close, to the local fishmonger. The fishmongers are all Asian, so I didn't know how to broach the subject of gefilte. My attendant returned my skeptical gaze with a knowing smile: "I grew up in LA and was bussed to a mostly Jewish school. I spent the first few years of my life thinking I was Jewish," he confessed.

I asked for carp, pike and whitefish, but they were out of pike and ground whitefish was $18 per pound - and my recipe called for 7 pounds! My fiance shook his head at me and questioned my sense of adventure. I told him that at least this is adventurous as I get - making traditional Jewish fish balls at all costs.

In the end, my fishmonger, my kindred gefilte fish spirit, geared me toward some alternatives and even threw in some of the whitefish for free. Here is the recipe I ended up creating based on a recipe from the Atlantic and My Jewish Learning. After all was said and done, I reduced the recipe down to 4 pounds of fish, substituted snapper for pike, and paid a reasonable $40 (including $2 per pound to grind the fish). And it made at least two dozen fish balls - more than enough for our little seder.

You will need:
approx. 2 lb snapper
approx. 2 lb carp
approx .5 lb whitefish
2.5 medium sized onions
3 medium sized carrots
3 tsp. salt (or to taste)
2 tbs. sugar (or to taste)
2 eggs
1/3 c. matzah meal
1/4 c. cold water
pepper (to taste)
dill, fresh or dried (optional)

Any assortment of mild, white fish (carp, pike, white, even snapper or halibut) equaling about 4 pounds after grinding will do. Ask the fish people for advice and don't fear innovation. You will need at least a couple of whole fish, but it's cheaper to buy some fillets because they get priced by meat alone (I never considered that the poundage would drop once the fish was dismembered!). Ask the fishmonger to grind the fish and to reserve the heads, fins, tails and bones, or to let you take home whatever he's got lying around.

-If you have the time, add a couple teaspoons of salt the ground fish and let it stand refrigerated overnight to release water.

-To prepare broth, place fish heads, etc. into a large pot and add water to cover. A less-mess way to do this is to wrap up the fish carcasses in cheesecloth. Add 2 tsp. salt and the sugar and bring to a boil, scooping off foam.
-Slice one onion into rounds and add it to the stock.
-Peel two carrots and add them (whole) as well, along with the dill.
-Let the stock simmer for about an hour - the longer it simmers the more flavorful it will be.

-Meanwhile, pulverize the remaining 1.5 onions and 1 carrot in the food processor, or grate by hand.
-Add onion and carrot to the ground fish and mix.
-Add eggs and mix.
-Add 1 tsp. salt, pepper, matzah meal and water and mix.

-Remove the fish remains and the vegetables from the stock - reserve them.
-Make a small ball with a pinch of the ground fish mixture and drop it into the simmering stock. Once it turns white and floats to the surface, remove it and taste it. Adjust seasonings. If it's not sweet enough, add a tad more sugar to the broth.
-Once satisfied with the sample, wet hands and mold the ground fish mixture into lumps about three inches long and two inches wide. You are, of course, free to make them bigger or smaller according to your own desire.
-In order to avoid sticking, wait a moment after placing each fish lump in the simmering broth before adding another. Stack them in layers until the mixture is gone. You can do this in batches if they don't fit the first time around.
-Let the gefilte fish simmer for about 20 minutes. Check one to make sure it is cooked through before removing. Gently remove each "fish" with a slotted spoon and place on a plate. Slice the carrots that simmered in the stock and place a disc on each fish like a little orange halo. If you have the stomach for it, place a fish head in the center of the plate.
-Serve cold with horseradish.

Gefilte fish is labor intensive, but it is a labor of love. Don't let anyone nay say your efforts or try to convince you it's not worth it. It is. You'll never go back to the jar again. Even someone like me, who gets squeamish around fish heads, found a peaceful reverence for the cycle of life by making this "mystery meat" from scratch. Once I tasted that first cooked fish ball, I knew I had reached a new level in my cooking. It was transcendent.

For a complete meal, serve gefilte fish as a first course before matzo ball soup. Better yet, simmer your matzo balls in the leftover fish broth! Add a little of the fish stock and the matzo balls to a new veggie broth for super flavor. Stay tuned for some amazing Passover (and all-year-round) desserts - that happen to be vegan, raw, and incomprehensibly delicious.
Share/Save/Bookmark

Wednesday, March 31, 2010

Sasha's Kitchen: Limoncello-Coffee Gelato


One of my favorite places in the world to travel is Italy.  I would love to make it back to Italy in the next couple of years with my husband, who has never been.  The food in Italy, not surprisingly, is absolutely amazing.  One of my favorite Italian desserts that I had in Italy was gelato, the Italian version of ice cream.  Another one of my culinary-memories from Italy involves limoncello, which I recently made from scratch, so when I came across a recipe for Limoncello gelato, I was sold.  I'm actually calling this recipe limoncello-coffee gelato because it also incorporates coffee beans in the recipe, and has a noticeable hint of coffee flavor to complement the limoncello as well.  The final product has a very sophisticated limoncello flavor with coffee undertones.  It is quite pleasant, refreshing and wonderful.  It reminds me of a taste of Italy with a twist.  I loved making this flavor, using my homemade limoncello since I love making food items from scratch and using them in my routine cooking.  I was pleased with the consistency of the gelato as well - creamy and smooth, just the way that gelato should be.  I adapted the original recipe to increase the limoncello flavor.  The coffee balances out the acidity and sweetness of the limoncello.

Limoncello-Coffee Gelato (Adapted from This Recipe)
2 cups heavy whipping cream
1/2 cup whole milk
1/4 cup buttermilk
1/4 cup mascarpone cheese
4 coffee beans
1 teaspoon finely grated lemon peel
1 vanilla bean, split lengthwise
4 egg yolks
1/2 cup sugar
2 T lemon juice
1/3 cup limoncello

Whisk the whipping cream, milk, buttermilk, cheese, coffee beans and lemon peel in a large saucepan.  Scrape in the seeds from the vanilla bean and add the remaining bean.  Cook over medium-high heat until bubbles form at the edges.  Stir occasionally, but do not allow the mixture to boil.  Remove from heat, cover and allow to seep for about 15 minutes.

Whisk the eggs, sugar and lemon juice in a mixing bowl.  Slowly combine with the warm cream mixture, and return the the custard to the saucepan.  Stir over medium heat until the custard thickens, using a candy thermometer to measure the temperature.  Remove from the heat when the temperature reaches 180 degrees, about six minutes.  Again, do not allow the custard to boil.  Pour the custard into a mixing bowl and stir in 1/3 of a cup of limoncello.  Just before you add the limoncello, remove any remaining vanilla bean, as well as the coffee beans from the custard.  I did this by simply filtering the custard in a strainer.

Chill for at least four hours in the refrigerator.  I did the preparatory part in the evening, so I allowed it to chill overnight until the next day.  Use an ice cream maker to freeze, following manufacturer's instructions.  The higher egg yolk content of gelato and the mascarpone cheese will result in the gelato freezing much faster than conventional ice cream in the ice cream maker.  To serve, either enjoy plain, or serve with drizzled limoncello.  I think that this would also taste fantastic with Round Pond Estate Napa Valley Olive Oil.

Gelato on FoodistaGelato
Share/Save/Bookmark

Tuesday, March 30, 2010

Sasha's Kitchen: Passover Mango Noodle Kugel


For the second night of Passover, I thought I would share my recipe for kosher for Passover noodle kugel, a Jewish version of noodle pudding made with gluten-free Kosher for Passover noodles.  During Passover, Jews cannot eat any leavened bread for eight days to commemorate the fact that they did not have time to wait for bread to rise when they escaped from slavery in Egypt.  This extends to pasta, hence special gluten-free Kosher for Passover noodles were used in this recipe.

This kugel recipe can be made two ways, either with or without half a cup of sugar.  If you use the sugar, it will be sweet like a conventional noodle kugel, but without the sugar, it is more of a noodle kugel with a bit of fruit - but without a residual sweetness.  Therefore, I have left the sugar optional in the recipe, depending your preference.  In addition, you will find that most noodle kugel recipes use cottage cheese rather than ricotta cheese.  I always use a combination of ricotta and non-fat sour cream because I simply detest cottage cheese and it is one of the few ingredients that I refuse to incorporate into any recipe (a trait I apparently picked up from my mom who also hates cottage cheese).

Sasha's Kosher For Passover Mango Noodle Kugel
Two boxes of Geffen Kosher for Passover gluten-free wide noodles
1 1/2 cups non-fat sour cream
1/2 cup sugar (optional)
1 mango, diced
1/2 cup raisins
16 oz skim milk ricotta cheese
1/2 stick of butter, melted
6 eggs

Preheat the oven to 375.  This is quite simple to prepare.  Simply prepare the pasta and combine in a bowl with all of the other ingredients.  Put in a large casserole dish and bake for about 45 minutes until golden brown.   Serve warm.
Share/Save/Bookmark

Sunday, March 28, 2010

Michelle's Kitchen in Toronto Passover Special - Laurie's Sephardic Charoset


It's that time of year again! No, not Easter - though that is also just around the corner. Passover (Pesach) for us Jews starts tomorrow night. Passover is an eight day Jewish holiday that commemorates the flight of the Hebrew slaves out of Egypt in biblical times. The Hebrews were trying to get out of Egypt as fast as they could so that the Pharoah would not have time to change his mind. As such, they did not have time to even allow their bread to rise so Passover is the holiday of Unleavened bread as well. Jews all over the world refrain from eating anything that expands when cooking or has leavening. This includes bread, rice, pasta and even some legumes. This is why we eat matzah - unleavened bread which resembles a large cracker - at this time of the year.

Just in time for my family's Passover seder (the traditional dinner), I decided to post my go-to recipe for charoset - one of the symbolic foods on our special seder plate. Many years ago, a dear family friend made a similar version of this charoset and I have been playing with it for years. It is in the Sephardic style, which means Jews from countries like Spain, Morrocco, Tunisia and Portugal.

Laurie's Sephardic Charoset

1 cup dried dates, pitted
1 cup dried cranberries
1 cup golden raisins
1 cup chopped dried apricots
1 cup chopped pitted prunes
1 cup pear peeled and cubed
1 cup apple peeled and cubed
1/2 cup chopped walnuts
3/4 cup red wine (I used a fruity Beaujolais)
1/2 cup apricot jam
1/2 tsp star anise
1/2 tsp cardamom
2 tsp cinnamon
2 tsp lemon juice
1/4 tsp salt
1 cup water (to start but keep water handy during the cooking process)

Put the fruit, nuts, spices and wine in a pot on medium heat. Allow the alcohol to burn off the put in the remaining ingredients. Simmer 1-2 hours until the fruit is soft, the water has reduced and the flavours condense. You may need to add more water during cooking so the fruit doesn't burn or stick to the bottom.

I grind my own spices, but you can use whatever you have on hand that is freshest. Laurie only uses cinnamon and nutmeg, but I forgot to buy nutmeg so I used what I had on hand. Also, any dried fruits will do, but if you are not using dates you may need to add some sugar and omit the lemon juice. Not only is this amazing on the seder plate, I also love it to have on matzah for breakfast with some cream cheese. Enjoy!
Share/Save/Bookmark

Sasha's Kitchen: Sweet Potato Gnocchi With Apple Cider Reduction Sauce


Gnocchi is one of my favorite main courses to have in an Italian Restaurant, but a good gnocchi is hard to come by.  I've actually never had sweet potato gnocchi, but I prefer almost every potato-oriented dish with sweet potatoes so I figured I would prepare a sweet potato gnocchi.  The first time I made gnocchi it was a disaster and the pieces of gnocchi tasted gooey and raw.  Since those days, I have perfected my technique.  The recipe that I adapted for our Friday night dinner was savory and delicious.  I made the gnocchi with a simple apple cider reduction sauce mixed with a bit of butter and garlic that was an amazing flavor combination.  When my husband and I both finished this meal, we both wanted more, which is one way of knowing that our dinner was a success.

Sweet Potato Gnocchi With Apple Cider Sauce (adapted from this recipe)
3 large sweet potatoes (about 3 lbs)
salt
2 cups apple cider
3/4 cup plus 2 T all-purpose flour
2 large egg yolks, beaten
pepper to taste
4 T unsalted butter
2 cloves garlic
4 sage leaves, chopped


Put the sweet potatoes in a large pot, covered with water.  Bring to a boil, then cover and summer for about 30 minutes until the potatoes are tender.  Allow to cool a bit, and then peel off the skin and puree the potatoes in a blender or food processor.

In a small saucepan, simmer and reduce the apple cider to about half a cup.  Add 2 T of butter to the apple cider to make the sauce.  Add the two cloves of garlic and the sage.  Set the sauce aside.  Note that these instructions differ from the actual recipe that I started from.

Combine the pureed sweet potatoes with the flour and the eggs.  Season the dough with salt and pepper. It should resemble and orange paste.

Bring a pot of water to a boil.  Use a pastry bag fitted with a tip to pipe the gnocchi onto a large baking sheet.  Pipe into 3/4 of an inch lengths.  Using a slotted spoon, transfer the gnocchi from the baking sheet and drop each int the pot of boiling water for about 45 seconds to 1 minute to cook.  Then remove the gnocchi carefully with the slotted spoon.

Melt the rest of the butter, and saute the gnocchi until golden for about two minutes in the butter.  Serve with the apple cider reduction sauce.


Share/Save/Bookmark

Saturday, March 27, 2010

Sasha's Kitchen: Momofuku Milk Bar's 'Crack' Pie


The following recipe is part of the Momofuku (David Chang) craze that has taken New York by storm.  I love the desserts at Momofuku Milk Bar.  Those of you who are familiar with Momofuku may already know about their famous Milk Bar "Crack" Pies that sell like hotcakes for $40 a pie.  The crack pies (which don't contain any crack at all, obviously) are pies made of an oatmeal cookie crust with a gooey butter & milk filling.  I was so happy with how mine came out using the actual Momofuku recipe from the Los Angeles Times adaptation.  In fact, I couldn't taste the difference between mine and the Milk Bar version at Momofuku in NYC.  So, if you are craving Momofuku Milk Bar, without further ado, here's how to make their famous "Crack" Pie.  It wasn't as complicated as it sounds from the recipe, I swear.  Actually, it was as easy as - well - pie.  It's a bit on the unhealthy side (all that butter) but oh so good as a special treat.  The recipe makes two eight inch pies so you have one to share with friends.  If you only want one, feel free to do the math and cut the recipe in half.


Momofuku Milk Bar Crack Pie (adapted from this recipe)

Cookie for Crust
2/3 cup plus 1 T flour
1/8 teaspoon baking powder (scant)
1/8 teaspoon baking soda (scant)
1/4 tsp salt
1 stick butter (softened)
1/3 cup light brown sugar
1 egg
1 cup rolled oats (scant)

Crust
crumbed cookie (above)
1/2 stick butter (melted)
1 1/2 T brown sugar
1/8 tsp salt

Filling
1 1/2 cups sugar
3/4 cups light brown sugar
1/4 tsp salt
1/3 cup plus 1 tsp dry milk powder
2 sticks butter (melted)


First, prepare the cookie.  Preheat the oven to 375 and combine the dry ingredients.  Beat the butter brown sugar and sugar in the basin of a stand mixer until light and fluffy.  Whisk in the egg, and beat in the dry ingredients, before stirring in the oats.

Spread on a cookie sheet like one big giant cookie.  Bake until golden brown for about 20 minutes.  Allow to cool.  Once cooled, crumble by hand, or in a food processor.  I was lazy and used my food processor.  Mix the crumble with the melted butter, brown sugar and salt in step two to make the crust.  Spray two eight inch pie dishes with PAM and press the crust into each shell to form a conventional pie crust.  Set the shells aside while you prepare the filling.

Heat the oven to 350.  Combine the brown sugar, salt and milk powder.  Whisk in the melted butte,r heavy cream and vanilla.  Gently whisk in the egg yolks.  Divide the mixture and use to fill the two shells.  Bake the shells for 15 to 20 minutes at 350 and then at 325 for another 10 minutes.  Remove the pies to cool on a rack when they are only slightly "jiggy" and are golden brown.  Refridgerate until chilled and dust with powdered sugar.  Serve chilled.  Yum!
Share/Save/Bookmark

Thursday, March 25, 2010

Sasha's Kitchen: Corn Chowder With Crab, Potatoes and Mushrooms


The following recipe was inspired by my desire to prepare a crab and corn chowder.  I researched a number of recipes and was loosely inspired by a recipe from an old issue of Gourmet magazine.  However, I made a number of changes, especially changing the spice mixture of the chowder.  The end result was good, but perhaps a bit on the busy side with a variety of different vegetables.  Next time I make the chowder, I think I will adapt the recipe further.  Here's what I plan to change the next time I make the recipe:  I will leave out the celery and leeks to make the recipe less busy, and I will puree the corn as a variation.  However, in my opinion, it was lovely this way, as well.  In addition, in the summer, it would be nice to prepare the recipe using fresh ears of sweet corn, but since it's only March, that was not an option for me at this time.

Despite my desire for the perfect chowder, this recipe was still very enjoyable and had a lovely texture.  I highly recommend making it, but encourage readers to make the variations that I suggested to make the soup a bit less complex.  Still, the broth had a lovely flavor and the potatoes, mushrooms, crab and corn all complimented each other nicely.  I have written the recipe below with the changes I will make next time incorporated.

Crab Corn Chowder (loosely adapted from this recipe)
4 cans of organic corn
3 cups whipping cream
4 cups low sodium chicken broth
1 cup chopped onion
1 cup chopped leeks [I suggest omitting these next time]
1 cup chopped celery [I suggest omitting these next time]
20 small baby golden potatoes
6-8 oz baby bella mushrooms
1 1/2 tsp ground fennel
1 1/2 tsp ground paprika
1/2 tsp cayenne pepper
pepper to taste
2 T butter
3/4 lb lump crabmeat
2 T sherry
1 tsp fresh thyme leaves
chives


First, puree the corn, or leave the corn whole (I might try pureeing next time in a miniprep).  Then, combine the corn with the whipping cream and chicken broth and summer for five minutes.  Set aside.

Heat 3 T of canola oil in a large saute pan.  Add the onions, fennel, potatoes, cayenne pepper and paprika.  Also add the leeks and celery if you are using them (I plan to leave them out next time to make the soup a bit less busy and to focus more on the other flavors).  Saute about 15 minutes until the vegetables are tender, including the potatoes - until the point that they are about halfway cooked.  Add mixture to the broth and simmer until the potatoes are tender, for about another 10 minutes.  Add some pepper to the broth, to taste.

Saute the mushrooms in a separate pan with the butter and sherry, and add to the soup.  Saute the crab in a bit of canola oil.  To serve, place a bit of crab in each bowl and top with chowder.  Season with pepper and chives.

This soup was enjoyable, but is a bit off from what I had hoped for when I was craving a crab chowder. I think it would be even better with the variations I suggest, and I think I will explore additional modifications the next time I am inclined to work on the recipe.
Share/Save/Bookmark

Eric's Kitchen in Jersey City: Shrimp & Mushroom Dumplings

Another dumpling recipe for the food blog! While these look just like my last recipe from the outside, they are filled with Shrimp and Shiitake mushrooms and so they taste pretty different. Sasha recommended trying to make my own wrappers this time but after looking at a few recipes online and trying to find the ingredients with no success I settled on using the same old wrappers I've always used. They came out great in the end and I definitely recommend this recipe for the filling at least!

Ingredients:
1 package of gyoza style dumpling wrappers
1.5 lbs. raw shrimp, cleaned and cut into thirds or fourths depending on the size
1-1.5 cups shredded red cabbage
4 large shiitake mushrooms, chopped
2 bunches of scallions, chopped
1-2 tbsp soy sauce
chili and sesame oil
1 tbsp or 1 clove minced garlic
chopped fresh ginger and or water chestnuts are also a great addition

These are pretty simple to make but require a great deal of time. If your wrappers are frozen make sure to thaw them thoroughly ahead of time. Then I chop up everything and put it in a large mixing bowl and give myself some surface area to wrap the filling. For the filling this time I decided I really wanted the shrimp to be the main ingredient so I made sure the pieces weren't too small and bought some decent sized shrimp. I made the mistake once of using salad shrimp. I will never do that again. Also make sure you add a little soy sauce to the filling mixture as it really brings out the flavor.

I tried to make sure each dumpling had about the equivalent of a whole shrimp as well as a decent amount of everything else. I placed this on the wrappers and you need to wet the edge of the wrapper with a little water and then just fold it up and press the edges firmly together. Try to make sure that they are nicely sealed as they don't cook as properly if they aren't.

When cooking these I use a combination of sesame oil and chili oil to handle the heat well and to give some kick. I'd put maybe a tablespoon of each in a large frying pan and let it get nice and hot before adding the dumplings. I fit as many in the pan as possible just because I'm usually making a large amount of these which is fine since they freeze well and can be reheated in an oven or toaster oven after thawing. It's good to leave them in the pan, uncovered until they are nicely browned on the bottom. You don't want to be eating raw shrimp but I also wouldn't recommend pre-cooking the shrimp as they might get overdone.

After they are browned on the bottom I turn them to brown on the side as well and pour a little water in the pan (maybe 1-2 tbsp) and immediately cover it, letting them steam until the water is mostly absorbed. Again this helps ensure that the shrimp cooks fully and usually helps tighten the wrappers. In the end you get a nice crunchy and slightly spicy shrimp dumpling. I usually end up serving it with some bottled dumpling sauce but making your own is pretty easy and usually just involves some rice wine vinegar, garlic, ginger, scallions and soy sauce. Pretty much what we used during our Mongolian Hot Pot as a dipping sauce.

Also see Sasha's Lamb Dumplings and Molly's Pork Hash.


Share/Save/Bookmark

Wednesday, March 24, 2010

Sasha's Kitchen: Pupcakes! Pug Puppy Cupcakes


Most of my food posts are recipe oriented.  I like to encourage readers of this blog to try new recipes that have worked well for me and made my family happy.  However, I also enjoy exploring the link between food and art.  I recognize that some of my cupcake recipes are probably not the most practical for those of you at home to try out, but are fun to read about nonetheless.  In exploring the link between food and  art, I previously did a series of pop art cupcakes where I replicated different modern art paintings by putting them into cupcake designs.  Over the weekend, I had a couple extra s'mores cupcakes from my most recent cupcake recipe, and decided to create a couple of one-off cupcakes that personified an important member of my family -- my dog, Dakota.

I have a pug, and I absolutely adore the breed.  Between the snorting, affectionate but playful antics, and the cute wrinkly faces and compact bodies, I think pugs are one of the greatest breeds of dogs on the planet.  Mine is sweet and spunky and an integral part of our family.  Her second birthday is coming up in April, so in honor of that, and in the spirit of creativity, I decided create pug puppy cupcakes -- which I refer to affectionately as "pupcakes."


My pupcakes were created using ready-made colored fondant in neutral colors.   I have not made my own fondant -- yet (it's a matter of time, really).  However, I have a series of cupcake projects planned that require large amounts of different colored fondant that are probably going to necessitate making it myself to get the colors right.  For this project, though, I purchased a package of Wilton neutral fondant from NY Cake.  The package came with fondant in two shades of brown, black and a peach fleshy color.  These are the perfect colors for making pugs!  I think that my pupcakes personify what I love best about pugs - that sweet wrinkly face, the big eyes and so much dog in such a small package.


Share/Save/Bookmark

Tuesday, March 23, 2010

Sasha's Kitchen: Food & Wine Pairing: Amaretto Panna Cotta & Wagner Vineyards Riesling Ice Wine


I recently received several bottles of wine from New York's Wagner Vineyards, on the shores of Seneca Lake, as a gratuity, to review for this website.  Because I love Ice Wines, was so excited that I could hardly wait to do my first pairing, with the 2007 Wagner Vineyards Riesling Ice Wine.

Wagner Vineyards, on New York's Finger Lakes Wine Trail (specifically Seneca Lake), is well known, and the recipient of numerous prestigious awards, for their Rieslings and Ice Wines.  They are one of the premier New York State Rieslings that have put Finger Lakes Wineries on the map.  Wagner is an Estate Winery, which means that all of the grapes are grown on vineyards located at the winery, for use in its wines.  It is one of the top Riesling and Ice Wine producers in the Finger Lakes and I am excited to have the chance to taste and review some of their wines.


I paired the 2007 Wagner Vineyards Riesling Ice Wine with my Amaretto-flavored panna cotta, topped with passion fruit caramelized apples.  The wine was a lively, fragrant and exciting Ice Wine.  It was not quite as sweet as the Canadian Ice Wines that I tasted on my wine tasting trip in Ontario.  However, it was a welcoming fruity dessert wine that was mild in its sweet overtures.  The wine had the pleasant aroma and taste of apples and raisins with tropical undertones.

I thought that the Wagner Ice Wine complemented the panna cotta nicely, and brought out the flavors in the amaretto and apples that incorporated into the dessert.  This was one of my favorite ice wines to date - a truly exemplary wine.  It was perfectly matched to the panna cotta.  The passion fruit used to caramelize the apples highlighted some of the tropical flavors in the Riesling Ice Wine as well.  This is not an overpowering dessert wine, but is a pleasant fruity Riesling Ice Wine.  It would also pair nicely with goat cheese or with creme brulee.  My husband and I really enjoyed it!

The panna cotta is quite easy to make, just allow a couple of hours for the dessert to solidify.  I chose to make it amaretto flavored because I have vast quantities of Amaretto from my liqueur making adventures (click here for my Amaretto recipe).  Below is my recipe for Amaretto Panna cotta, which I developed after looking at numerous recipes for plain panna cotta and creating my own that incorporated the subtle, sweet almond flavoring.  My recipe made three desserts, although this depends on the size of the bowls that you use as molds.

Sasha's Amaretto Panna Cotta With Caramelized Apples
1 envelope gelatin
2 1/2 T cold water
1 cup heavy cream
1/2 cup whole milk
1/4 cup sugar
3 T Amaretto
1/3 cup passion fruit juice (for apples)
3 T sugar (for apples)
1 apple, peeled and sliced

To prepare the panna cotta, add the water to the gelatin.  Meanwhile, combine the cream, milk and sugar (a quarter cup) over medium heat and mix until the sugar is dissolved.  Add the amaretto and the gelatin and stir over medium heat until the gelatin is dissolved.  Do not allow the mixture to boil or bubble.  Pour into small glass bowls or ramekins, and refrigerate for two hours.  When the panna cotta is chilled, cut around the sides with a knife or toothpick until it comes out of the mold when you flip it over (this is a bit tricky, and I found the toothpick worked best to loosen the panna cotta).  I also caramelized some apple slices in 1/3 cup of passion fruit juice with 3 T of sugar and used these to top the panna cotta because the apple flavor complemented the Wagner Riesling Ice Wine so nicely.

Click here to read my wine pairing of Heron Hill Winery's Riesling With Cheese Fondue and click here to read my pairing of Rooster Hill Winery's Riesling with Apricot Almond Couscous.  Click here for my review of Ontario Ice Wines and here for Michelle's Review of Ontario Ice Winery Lailey Vineyards.
Share/Save/Bookmark

Monday, March 22, 2010

Sasha's Kitchen: Romaine Salad With Goat Cheese Fritters, Dried Cranberries, Pecans & Passion Fruit Dressing


Last week, I had a wonderful salad with goat cheese fritters, pumpkin seeds, boston bibb lettuce and dried cranberries at the Farm On Adderley (click here to read my review), I was inspired to create a similar salad using goat cheese fritters.  I had tried to deep fry goat cheese years ago in making a salad and it was a disaster - the goat cheese melted during the frying process. This time, I did a bit of research and learned that the process would work effectively if you freeze the goat cheese for about 45 minutes (not longer) prior to the battering and frying.  It worked, and the salad was a huge success at my Saturday brunch with our guests.

For the salad dressing, I did a unusual take on a fruit reduction vinaigrette and created my own passion fruit reduction using some Welch's passion fruit juice that I purchased at the grocery store.  The dressing was sweet but complemented the goat cheese and the tangy dried cranberries in a lovely way, and had the distinct flavor of passion fruit that I love so much.  Another note, I absolutely would have loved to use Boston (Bibb) lettuce with this salad, but it wasn't available fresh right now at my grocery stores and organic market so I had to settle for romaine, which was pretty good, as well.

Sasha's Romaine Salad With Goat Cheese Fritters, Dried Cranberries, Pecans & Passion Fruit Vinaigrette (4 salads)
Large head of romaine lettuce or Boston (Bibb) lettuce (2 heads if you use Boston lettuce)
dried cranberries
chopped pecans
8 oz goat cheese
2 eggs
dried bread crumbs (I recommend using plain bread crumbs, not Panko for this recipe)
2 cups passion fruit juice
1/2 cup canola oil


To prepare the goat cheese fritters, form the goat cheese into 12 balls.  Put in the freezer for about 45 minutes.  Remove frozen balls of goat cheese from the freezer, batter in beaten eggs, and coat with breadcrumbs.  Deep fry following the instructions for your deep fryer, or in a large pot with a couple inches of oil.  If you are using a hot pot, about three inches of canola oil and a heat setting of about 350 degrees is what my husband used (yes, it's true, Brad did the deep frying, not me because I hate deep frying!)

To make the dressing, reduce the passion fruit juice to about 1/2 a cup by heating on high for about 20 minutes or so.  Then, mix with the canola oil to form a dressing.  Assemble the salads with the lettuce, pecans, goat cheese balls and dried cranberries.  I was very happy with the reception I got from this salad from our brunch guests!
Share/Save/Bookmark

Eric's Kitchen in Jersey City: Bacon, Mushroom & Spinach Quiche

My Mom makes amazing quiche and I wanted to try and it make it like she does but she was away on vacation and so I couldn't get her recipe. So I looked up how to make a healthier pie crust online (see below) and looked in my copy of the Joy of Cooking book for a recipe for the filling. I used their Quiche Lorraine recipe as a guideline and added sauteed mushrooms and spinach.

Crust: (from this wonderful website)
1.5 cups whole wheat flour
3/4 tsp sea salt
2 tbsp whole milk
1/2 cup olive oil

So obviously you need to make the crust first. This recipe is great for things like quiche or maybe even a cheesecake as it's a very crumbly crust, almost like graham cracker crusts. I wouldn't recommend it for pies although I've never made a pie! Preheat the oven to 375 and mix your salt and flour first. Combine the milk and oil and then add them to the flour mixture. Mix it all thoroughly and then form it to your pie pan. I used a glass Pyrex pan and greased it slightly with olive oil Pam. Bake for 20 minutes.

Filling:
3 eggs
2 cups whole milk
1/2 lb. bacon, cooked and crushed into bits
1/2 package baby bella mushrooms
handfull fresh spinach
1/3 cup onion, chopped
pinches of white pepper & paprika
1/2 cup shredded Gruyere cheese

For the filling, I started with the bacon. I cooked it until crispy and let it dry on some paper towels and removed MOST of the fat from the pan. My mom would kill me for doing this as she's a total health nut, but I then cooked the mushrooms and onions in the remaining bacon fat with a little black pepper. It just seemed like a waste to not use it and it gives such a good flavor. When the mushrooms and onions were soft I added the spinach for just a few seconds until it was wilted and then set these aside.

To keep your crust from getting soggy you can brush it with an egg white before adding your other ingredients. Preheat the oven to 375 or if you're doing this all at once leave it hot. The recipe then said to crumble the bacon and make a layer at the bottom of the crust and then add your shredded cheese on top of that. I wondered at this point if the filling would mix properly or if everything would be at the bottom but continued and added the mushrooms, onions and spinach on top of the cheese.

You then want to combine the the eggs, milk and spices and pour these on top of the other ingredients. You will notice that many of them will float, giving you a more evenly mixed filling. Bake this for about 40 minutes until it's nicely browned on top. Next time I may add another layer of cheese to the top to help it brown even more. In the end you should have a nice, fluffy and delicious meal or snack for any time of the day.


Share/Save/Bookmark
Related Posts with Thumbnails Share